Let’s Encrypt is an Open Source new Certificate Authority (CA) that provides an easy way to obtain and install TLS/SSL certificates so newbies can start using fast and safer version of the internet. Since Certificate Authorities charge too much for the TLS/SSL certificates Let’s Encrypts initiative is a revolution in this industry.
In this tutorial, I’ll show you how to install Let’s Encrypt and secure Nginx web server which is using Ubuntu 16.04 LTS or later.
Before proceeding ahead make sure that you have root user or root enabled access to the server.
Install or update Nginx using command: (Skip this if you have already running website on Nginx)
apt-get update
apt-get install nginx
Step 1: Add a Hidden Location Block
The default server location block is here at nano /etc/nginx/sites-available/default. The .well-known is a hidden directory which will be used by Let’s Encrypt to verify your domain. Just add the following code inside the server block so let’s encrypt can use it for verification purpose.
location ~ /.well-known { allow all; }
Save the changes.
service nginx reload
Step 2: Obtain Certificates from Let’s Encrypt
Install let’s encrypt service which can be installed quickly.
apt-get install letsencrypt
We have to install let’s encrypt client and now we need to obtain the certificate.
letsencrypt certonly --webroot -w /var/www/html -d example.com -d www.example.com
From the above command replace the domain name/s with yours. (If you have hosted the website at a different location other than /var/www/html then change it as well from above command, otherwise it won’t be able to verify your domain and unable to generate certificates for you.)
Once you hit enter Let’s Encrypt will verify your domain name for the availability and once it crosses verifies everything it will generate certificated for you. By the time you will be asked for an email address and accepting their terms and condition. Provide an active email which works; because once your certificate is about to expire it will send you a notification.
If everything works well then you will see a congratulations message.
Step 3: Install Certificates
Since we have already obtained certificates from Let’s Encrypt we need to quickly install it and get things done.
Created a new server block at the beginning of your current configs.
server {
listen 80;
server_name example.com www.example.com;
return 301 https://$host$request_uri;
}
and modify the existing one with following the new one.
server {
listen 443 ssl;
server_name example.com www.example.com;

#Server Hello
ssl_certificate /etc/letsencrypt/live/example.com/fullchain.pem;
ssl_certificate_key /etc/letsencrypt/live/example.com/privkey.pem;
ssl_session_cache shared:SSL:20m;
ssl_session_timeout 180m;
ssl_session_tickets off;
...........................
... rest of the configs ...
...........................
}
Now just save the new configs and to further increased security, you should also need to generate a strong Diffie-Hellman group which is recommended for production environment.
Step 4: Generate Strong Diffie-Hellman Group
To generate a 2048-bit group, use this command.
openssl dhparam -out /etc/ssl/certs/dhparam.pem 2048
Now wait for some time, it will generate a strong certificate.
In Nginx server block copy paste following lines below SSL certificates’ lines.
#Diffie-Hellman Parameter for DHE Ciphersuites (Recommended 2048 bits)
ssl_dhparam /etc/ssl/certs/dhparam.pem;

#Intermediate Configuration (Tweak to ur needs)
ssl_protocols TLSv1.2 TLSv1.1 TLSv1;
ssl_prefer_server_ciphers on;
ssl_ciphers ECDHE-RSA-AES128-GCM-SHA256:ECDHE-RSA-AES256-GCM-SHA384:ECDHE-RSA-AES128-SHA256:ECDHE-RSA-AES256-SHA384:ECDHE-RSA-AES128-SHA:ECDHE-RSA-AES256-SHA:ECDHE-RSA-DES-CBC3-SHA:AES128-GCM-SHA256:AES256-GCM-SHA384:AES128-SHA256:AES256-SHA256:AES128-SHA:AES256-SHA:DES-CBC3-SHA:CAMELLIA256-SHA:CAMELLIA128-SHA256;

#OCSP Stapling (Fetch OCSP records from URL in ssl_certificate and cache them)
ssl_stapling on;
ssl_stapling_verify on;
ssl_trusted_certificate /etc/letsencrypt/live/example.com/chain.pem;
resolver 8.8.8.8 8.8.4.4 valid=300s;

#HSTS and Some Secure Headers
add_header Content-Security-Policy "default-src 'self' 'unsafe-inline' 'unsafe-eval' https: data:";
add_header Strict-Transport-Security "max-age=31536000; includeSubDomains";
add_header X-XSS-Protection "1; mode=block";
add_header X-Content-Type-Options nosniff;
Now restart Nginx to see the changes.
service nginx reload
The Let’s Encrypt TLS/SSL certificate is now in place. At this point, you should test that the TLS/SSL certificate works by visiting your domain via HTTPS in a web browser. I strongly suggest rewriting your links of your website to https to see the green color on the address bar.
You can use the Qualys SSL Labs Report to see how your server configuration scores:
https://www.ssllabs.com/ssltest/analyze.html?d=example.com
Step 5: Future Renewals
Let’s Encrypt certificates are valid for 90 days only, but it’s recommended that you renew the certificates every 60 days to allow a margin of error does not affect your resources. At the time of this writing, automatic renewal is still not available as a feature of the client itself, but you can manually renew your certificates by running the Let’s Encrypt client with the renew option.
letsencrypt renew
Restart Nginx to save the changes.
service nginx reload
Auto Renew SSL Certificate (Optional)
If you want everything gets done automatically then you can add a Cron job to auto renew SSL certificates. We just need to specify time and date along with renewal instruction in crontab to get things done.
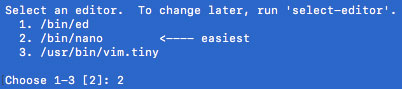
crontab -e
If you are using crontab function for the first time you will be asked for choosing editor type first; just choose one with NANO editor which would be indicated with <—- easiest.
New editor windows will open, just go the end and paste following code.
51 23 * * 6 /usr/bin/letsencrypt renew >> /var/log/le-renew.log
55 23 * * 6 /bin/systemctl reload nginx
now just save it and exit by Ctrl+O (Save) and Ctrl+X (Exit).
LetsEncrypt offers us to renew certificate after 60 days once we make one, thus we can add a function to renew it weekly. Here I have set the time 23:5X PM on Saturday every week. Make a note that this would function according to your server’s local time which is by default UTC. If you want to make it according to your region, just set your timezone to your region.
This is how we can install Let’s Encrypt and secure Nginx in Ubuntu 16.04 LTS or later systems.
Leave a Reply